How to export GarageBand to mp3 on iPad, mac, iPhone, and PC? GarageBand is one of the most well-known and widely used free applications for creating music, which can be downloaded from the Mac App Store. It has strong features for blending various instrument soundtracks and an intuitive interface that enables you to record music directly from your device. In addition, it is straightforward to use.
The Audio Interchange File Format (AIFF) is one of the file types that may be exported from GarageBand and imported into other Apple products. Compared to their compressed counterparts, AIF files might be five to 10 times bigger.
The easiest way to reduce the amount of storage space required on your smartphone is to convert your GarageBand files to MP3 format. The most popular and extensively used audio format nowadays is called MP3.
This little tutorial will demonstrate how to convert GarageBand files to MP3 without experiencing any difficulties.
How Can I Convert a File from GarageBand to an MP3?
Contents
The ability to export from AIFF to MP3 is available in GarageBand versions 10.0.2 and above. You only need to follow the guidelines that are listed below:
Step 1: Launch GarageBand and open your project there.
Step 2: Select the Share option from the Menu.
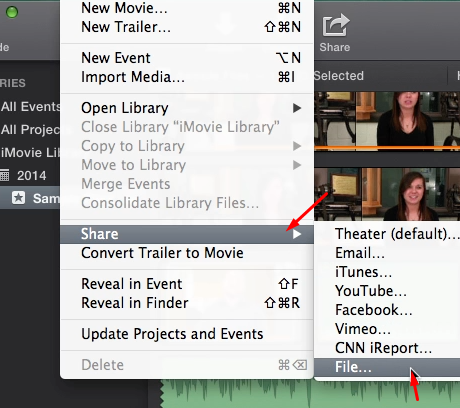
Step 3: The dropdown menu should provide an option to Export the Song to the Disk.

Step 4: Select MP3 as the file type to export.

Step 5: After making your selection, click the Export button.
How Can I Convert GarageBand Tracks to MP3 Using iTunes?
If you use a Mac, there is a good chance you already have iTunes installed on your computer. By following these instructions, you will be able to utilize it to convert GarageBand files to MP3 format:
Step 1: Add the GarageBand file you wish to convert to the iTunes library by dragging and dropping it there.
Step 2: Choose the Preferences tab.
Step 3: Choose MP3 Encoder from the dropdown Menu under Import Settings.
Step 4: Return to the file you were working on, right-click on it, and select the Create MP3 Version option from the context menu.
Why Converting GarageBand Tracks to MP3 May Not Be as Easy as It Sounds?
Converting files from GarageBand to MP3 presents several challenges, including the following:
Extra Tips: How to Fix the Problem Where GarageBand Won’t Import MP3
In addition to converting GarageBand to MP3, there is a possibility that you could experience issues while loading MP3 files. When you have great music playing in the background, but GarageBand won’t load it or let you modify the tempo of the original song, it may be pretty frustrating. Here are three potential solutions to try.
1. Make sure that the file extension is in lowercase.
There is a possibility that GarageBand will experience difficulty importing a file whose extension is capitalized “MP3.” For example, most audio files captured on a Surface Pro or an Olympus LS-10 use the MP3 format. Replace it with “mp3” with the lowercase letter.
2. Be Sure to Pay Attention to the Sample Rate and Bit Depth.
The support for mp3 files with a sampling rate of 44.1 (kHz) and a bit depth of 16 bits is significantly improved in GarageBand. If your file contains higher parameters, there is a possibility that the playing speed will be affected or that the file will not import at all.
3. Change the file format to an Apple-compatible AIFF.
AIFF, which stands for “Audio Interchange File Format,” performs superiorly on Apple Macs while editing and creating music. Convert your mp3 file to AIFF format if you have problems working with it in GarageBand.
If you still need more guidance, then visit this tutorial.