Contents
- 1 An effective method for recording using GarageBand
- 1.1 1. Connect your computer’s audio interface
- 1.2 2. To Use the Audio Interface, Please Connect Your Microphone Or Instrument.
- 1.3 3. Get Noise-Blocking Headphones to Stop Audio Leakage
- 1.4 4. Get A Microphone Stand
- 1.5 5. Get A Pop Filter
- 1.6 6. Music Stand
- 1.7 7. A Stool and Chair
- 1.8 8. A Workstation with Several Separate Compartments
- 1.9 9. Studio Monitors
- 1.10 10. How to Set Your Gear Up?
- 1.11 How to Make an Audio Recording With GarageBand?
- 1.12 How do I add a new track?
- 1.13 How can I use GarageBand’s instruments in a recording session?
- 1.14 How do I record multiple takes?
- 1.15 What are the steps involved in adding equalization effects to tracks?
- 2 Bottom Line
When it was released in 2004 as part of Apple’s iLife suite of creative software, GarageBand fundamentally altered the process by which Mac users compose and perform musical compositions.
The breadth of GarageBand’s capabilities includes recording simple voice recordings up to recording numerous tracks of audio with filters that effectively resemble sampled instruments.
It is possible to export files from GarageBand in several different formats and then share them in a podcast; use them with an iPod, iPhone, or iPad; send them via email, or stream them over the internet.
An effective method for recording using GarageBand
Your first order of business is to ensure that your audio interface is properly connected to your computer. Suppose you’ve invested in an audio interface. In that case, you’ll have access to all the necessary equipment, including the USB to Firewire cable plugged into the back of the device and the computer.
1. Connect your computer’s audio interface
Assuming that you are using a more recent model of the MacBook Pro or another computer manufactured by Apple, you will want a USB-C converter to connect the equipment.
If you do not already own one, I strongly suggest investing in a hub that serves several purposes and has a variety of inputs and outputs.
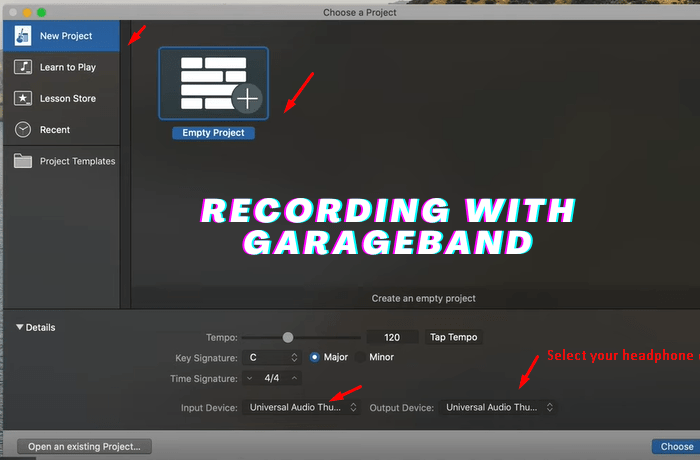
As soon as you connect the audio interface to your computer, you will see that Garageband, as well as your computer itself, will automatically detect the device.
You will, however, need to go into the options of Garageband and pick the necessary input and output controls to verify that everything has been completed successfully.
I have the output set to the natural output of the computer, which is the same as the speakers already built into the device. You could discover that your computer or Garageband has trouble identifying the device in certain circumstances. This could be the case if you are using an older model.
In this scenario, you can either restart Garageband while keeping the interface plugged in or restart the computer entirely to get it to detect it.
2. To Use the Audio Interface, Please Connect Your Microphone Or Instrument.
This component should not require much explanation. You can use either an XLR cable or a standard guitar cable to plug the instrument into the device, and then you’re ready to go. There are several instances in which buying a microphone that does not come with an XLR cord can serve your needs just fine. If you already possess a guitar or bass, there is a good chance that you already have a suitable wire.
3. Get Noise-Blocking Headphones to Stop Audio Leakage
This next component may seem unimportant, but if you’re only recording voices, you don’t want any music playing in the background.
Unfortunately, you will always have some microphone leakage in your recordings; this won’t eliminate the problem until you lower the playback recording as far as possible.
Alternative methods of lowering ambient noise include:
4. Get A Microphone Stand
When I record my voice using GarageBand and ScreenFlow Editor, I prefer to have a microphone on my desk.
Because of this, I want to have at least two microphone stands: one for when the microphone is sitting on the desk and another for recording voices.
5. Get A Pop Filter
The plosive noises that can be heard in your audio recordings, particularly for voices, can be removed with a pop filter. Some consonant sounds, such as the “s” sound and the “p” sound, have a characteristic that may be described as being extremely loud.
These are, without a doubt, the sounds that annoy people the most in the English language, and I’m sure they do the same thing in other languages as well.
These noises are going to be significantly muffled by a pop filter. You might also utilize Melodyne after the event to assist in getting rid of the sound, but it is ideal for getting rid of it as soon as possible. Prevention is always preferable to treatment if possible.
6. Music Stand
Investing in a music stand, such as the kind sold by Yorkville or another firm of a similar kind, is another excellent choice. It should not be necessary to explain a music stand; its purpose is to carry guitar tabs, sheet music, and other musical materials.
7. A Stool and Chair
I would suggest investing in a stool in addition to a chair to use on your computer. Choose an option that is of a higher quality for both. For example, a stool wholly constructed out of wood is stable and does not wobble, as well as a chair for using a computer that provides support for the back and the neck.
8. A Workstation with Several Separate Compartments
This is possibly the most significant component of setting up a home recording studio since, as time goes on, you are going to have so much equipment that you need a location for all of this stuff to sit; otherwise, you would have to connect everything up over and over again every time you want to start to work.
You may get an idea of what this seems like by looking at the image immediately below this one, as well as the portion that comes after it. Take note of the fact that the computer display is supported by a stand that is perched just atop the work surface of the desk.
You want this to be the case since it will allow you to save a significant amount of room by positioning your audio interface and any other necessary equipment just below the display.
9. Studio Monitors
When it comes to picking up studio monitors, there are several different considerations to take into account. But in the end, everything boils down to an issue of taste and desire. Others swear by the sound quality of JBLs, while others are partial to the Yamaha brand of monitors.
When looking for studio monitors, there are a few considerations that should be kept in mind. Your first order of business will be to check whether or not the monitors are suitable for use with the audio interface. Second, you will need to determine the number of speakers you want; will you need one pair or two? Your final step will be selecting the appropriate speaker size for your needs.
After you’ve thought about all that’s been mentioned, you’ll be ready to start looking for a set of studio monitors that are a good fit for your requirements and preferences. And who can say for sure? You never know if you could even find a pair you fall madly in love with!
10. How to Set Your Gear Up?
In most cases, it is preferable to have a somewhat long and broad desk, with a section partitioned off specifically for the use of the computer display.
In addition, it is highly recommended that you purchase two separate stands for the speakers; doing so will allow you to set up your system without being hampered by the presence of two speakers. Your other moveable equipment ought to be stored on the desk, which is its intended use.
It is possible to go this one step further by installing noise-canceling pads directly behind the studio monitors to reduce the amount of sound transmitted through the wall.
You could keep all your other equipment, such as guitars and other instruments, on the side of this desk. In another part of the room, you might have a microphone attached to a pop filter and a music stand to store lyrics and other sheet music or tablature.
How to Make an Audio Recording With GarageBand?
1. Connect an external, stand-alone microphone to your Mac by plugging it into the port designated for audio input. After inserting the headphones into the jack for the headphones, put the headphones on your head.
2. Launch GarageBand. The “Audio/MIDI” tab may be accessed by going to the “Preferences” submenu on the main menu. Choose “Line In” from the dropdown option next to the “Audio Input” heading.

3. Navigate to the main menu and pick “Track,” then “New Track.” Alternatively, you may click the “Add Track” button in the bottom-left corner of the window, which is represented by a “+” sign. To make an audio tape of your voice, guitar, or any other instrument the microphone can record, select the “Real Instrument” track option from the dropdown menu, then click the “Create” button.

4. To set the volume, move the slider labeled “Recording Level,” located at the very bottom of the interface. Please use the microphone to communicate. Always keep an eye on the levels to ensure the sound is recorded.

Place the white played at the location on the timeline where you would like the recording to start. After singing or speaking into the microphone, you may stop the recording by pressing the red record button a second time. The recording will then be deleted.
5. Listen to the audio recording you made by advancing the playback using the spacebar after you have moved the white played to a point in the chronology where you recorded the audio and then brought it back to the beginning of the timeline. To cancel the current playback, use the spacebar once again.
6. Save your work by giving the project a name and selecting “Save” from the File menu.
How do I add a new track?
How can I use GarageBand’s instruments in a recording session?
How do I record multiple takes?
What are the steps involved in adding equalization effects to tracks?
Bottom Line
When it comes to recording with Garageband as your interface, the procedure I described before is undoubtedly the most effective method to do it. There may be further choices available, but this one should meet your needs very enough.