
Introduction: Creating a custom ringtone for your phone is a great way to personalize your device and set it apart from others. With GarageBand, Apple’s free digital audio workstation software, you can easily create your own unique ringtone using your favorite song or audio clip. In this guide, we’ll walk you through the step-by-step process of creating a ringtone in GarageBand.
How to make a ringtone in GarageBand?
Contents
Step 1: Choose Audio Clip
Choose Your Audio Clip The first step in creating a ringtone in GarageBand is to choose the audio clip that you want to use. This can be a song that you have in your music library, a sound effect or any other audio clip that you have saved on your computer.
To import the audio clip into GarageBand, simply click on the “File” menu and select “New Project.” In the “New Project” dialog box, select “Audio” and click “Create.” Then, click on the “Media Browser” button in the top-right corner of the GarageBand window and navigate to the location of your audio clip. Click and drag the audio clip from the Media Browser to the timeline at the bottom of the GarageBand window.
Step 2: Edit Audio
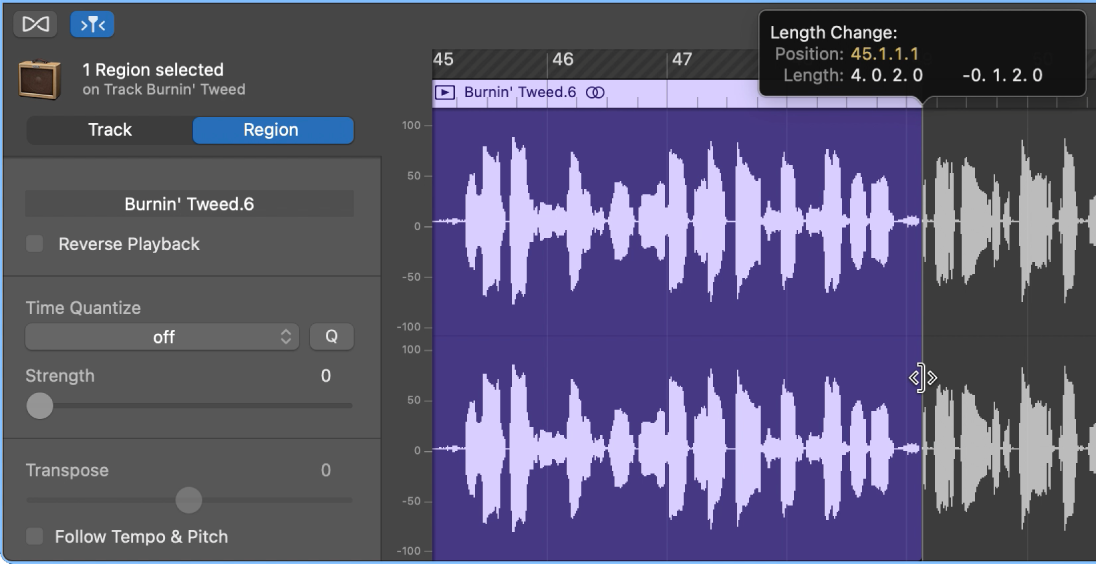
Edit Your Audio Clip Once you have imported your audio clip into GarageBand, you can edit it to create your ringtone. Start by trimming the audio clip to the length that you want your ringtone to be. To do this, click and drag the yellow “playhead” on the timeline to the point where you want the ringtone to start. Then, click on the “Edit” menu and select “Split” to split the audio clip at that point. Finally, click and drag the playhead to the point where you want the ringtone to end and repeat the “Split” process.
Once you have trimmed your audio clip to the desired length, you can also edit the volume and add any special effects that you like. To adjust the volume of your audio clip, click on the “Track Info” button in the bottom-right corner of the GarageBand window and use the volume slider to adjust the volume.
Step 3: Export Mp3 Ringtone
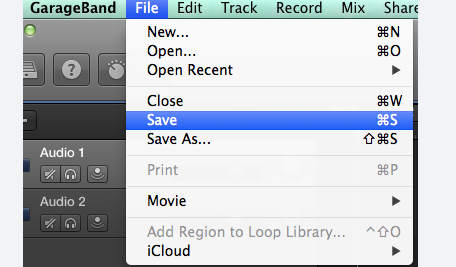
Export Your Ringtone Once you have edited your audio clip to create your ringtone, it’s time to export it. To do this, click on the “Share” menu in the top-right corner of the GarageBand window and select “Ringtone.” In the “Ringtone” dialog box, give your ringtone a name and select the type of device that you will be using it on.
READ: How to Export Garageband To Mp3?
Note that the ringtone format may vary depending on the device you are using. For example, iPhones require ringtones to be in the M4R format, while Android devices require the MP3 format. Be sure to check the device’s specifications before exporting your ringtone.
Once you have selected the device type, click “Export.” GarageBand will export your ringtone and save it to your computer’s iTunes library.
Step 4: Transfer Ringtone to iPhone
Transfer Your Ringtone to Your Phone The final step in creating a ringtone in GarageBand is to transfer it to your phone. If you are using an iPhone, you can do this by connecting your phone to your computer and syncing it with iTunes. Once your phone is synced, you can select your new ringtone in the “Sounds” menu in your iPhone’s settings.
READ: How to Use Garageband on iPhone?
If you are using an Android device, you can transfer your ringtone by connecting your phone to your computer and transferring the MP3 file to your phone’s storage. Then, go to your phone’s settings and select “Sounds and vibration,” followed by “Ringtone.” From there, you can select your new ringtone and set it as your default ringtone.
How to make a ringtone with GarageBand from a video?
If you have a video clip that contains audio that you want to use as a ringtone, you can still use GarageBand to create your custom ringtone. Here’s how to do it:
Creating a ringtone from a video clip may take a bit more work than using an audio file, but it can result in a unique and personalized ringtone that truly reflects your taste and style.
How to make a ringtone on iPhone with GarageBand?
Creating a custom ringtone on an iPhone using GarageBand is a simple process. Here’s how to do it:
Step 1: Choose Your Audio Clip Open the GarageBand app on your iPhone and choose the “Audio Recorder” option. You can also choose “Sampler” if you want to use your own sounds.
Step 2: Record or Import Audio Clip Record your audio clip or import it by tapping on the loop icon in the top-right corner of the screen and selecting “Files” or “Music.” Select the audio clip that you want to use for your ringtone.
Step 3: Edit Your Audio Clip Trim your audio clip to the desired length by dragging the yellow bar on the timeline. You can also adjust the volume and add special effects if desired.
Step 4: Share Your Ringtone Once you have edited your audio clip, tap on the arrow icon in the top-left corner of the screen to open the sharing menu. Select “Ringtone” from the list of options.
Step 5: Name Your Ringtone Give your ringtone a name and adjust the length if needed. Then, tap on “Export” to save your ringtone to your iPhone’s ringtone library.
Step 6: Set Your Ringtone To set your new custom ringtone as your default ringtone, go to your iPhone’s “Settings” app and select “Sounds & Haptics.” Tap on “Ringtone” and select your new ringtone from the list of available ringtones.
That’s it! With GarageBand, creating a custom ringtone on your iPhone is quick and easy. Now you can have a personalized ringtone that sets your phone apart from the rest.
Conclusion:
Creating a custom ringtone in GarageBand is a fun and easy way to personalize your phone. By following the steps outlined in this guide, you can create a unique ringtone that reflects your style and taste in music. GarageBand makes it easy to edit and export your audio clip, and with a little creativity, you can create a ringtone that sets your phone apart from the rest.
One thing to keep in mind when creating a ringtone is to make sure that you have the legal right to use the audio clip. If you are using a song that you have purchased, it may be subject to copyright laws. It is important to do your research and make sure that you are not infringing on any copyright laws when creating your ringtone.
Another tip for creating a great ringtone is to choose an audio clip that has a clear and recognizable melody. This will help your ringtone to stand out and make it easier for you to identify when your phone rings.
Finally, don’t be afraid to experiment with different editing techniques and effects in GarageBand. You may be surprised at the unique sounds and tones that you can create with a little bit of experimentation and creativity.
In conclusion, creating a ringtone in GarageBand is a fun and easy way to personalize your phone and make it stand out. By following the steps outlined in this guide, you can create a unique ringtone that reflects your style and taste in music. So, go ahead and get creative – your new custom ringtone is just a few clicks away!